Felt heart keychains: a hand-sewn Valentine
Two felt hearts, a little stuffing and a blanket-stitched edge: a small, personal Valentine you can sew by hand in about an hour.
Quick answer
Cut two felt hearts and a small felt tab, embroider initials on the front heart, slip a key ring onto the folded tab and tuck it between the hearts, then blanket stitch around the edge, stopping near the end to fill the heart with stuffing. It takes about an hour, costs only a few dollars per keychain, and needs nothing more than a needle, floss and scissors.
- Time 45–90 minutes per keychain
- Difficulty Easy (beginner hand sewing)
- Cost $10 – $20 for supplies; about $2–$4 per keychain after that
- Makes Several keychains from one or two felt sheets
A felt heart keychain is small enough to clip onto a bag or key ring every day, which is exactly why it works as a Valentine. It is not an expensive object, but every stitch is visibly handmade, and initials or a date stitched into the front turn it into something nobody else has. It is also one of the gentlest introductions to hand sewing, because felt does not fray and the blanket stitch both joins and decorates the edge. You will find related projects in our sewing gifts section and the full list of DIY Valentine's ideas.
What you need
- Felt in two or three colors (9 x 12 in sheets are plenty). Wool or wool-blend felt is thicker and wears better than thin acrylic craft felt on an everyday keychain.
- Six-strand embroidery floss in a matching or contrasting color
- An embroidery needle with an eye large enough for two or three strands
- Polyester fiberfill stuffing (a small handful per heart)
- A split key ring, or a key ring with a short chain or lobster clasp
- Sharp fabric scissors and small embroidery scissors
- Paper or card for a template, plus a disappearing-ink fabric pen or chalk
- Pins or small fabric clips
- A chopstick or the blunt end of a pencil for stuffing
- A needle minder or pincushion
Step-by-step instructions
Make a heart template
Fold a piece of paper in half and draw half a heart against the fold, then cut it out and unfold it for a perfectly symmetrical shape. About 2 1/2 to 3 inches tall is a good keychain size: big enough to stitch comfortably and to fit initials, small enough not to get in the way. Also cut a tab about 1/2 inch wide and 2 1/2 inches long.
Trace and cut
Trace the template twice onto felt with a disappearing-ink pen and cut just inside the line so no marks show. Cut one felt tab in the same or an accent color. Smooth, confident cuts with sharp scissors give cleaner curves than lots of little snips.
Embroider the front heart
Do any embroidery now, while you can reach the back of the felt. Lightly write initials, a date or a tiny word such as "XO" on one heart with the fabric pen and stitch over the lines in backstitch or split stitch using two strands of floss. Keep letters simple and slightly chunky; fine script is hard to read on felt. Knot the thread on the back, where it will be hidden inside the heart.
Attach the key ring tab
Thread the tab through the key ring and fold it in half. Place the two hearts together, embroidery facing out, and slide the cut ends of the tab between the layers at the top center dip of the heart, a design used in Benzie Design's heart keychain tutorial. Pin everything in place, then make a couple of straight stitches through all the layers to anchor the tab, going through the same holes twice for strength. This tab carries all the strain of daily use, so do not skimp here.
Blanket stitch around the edge
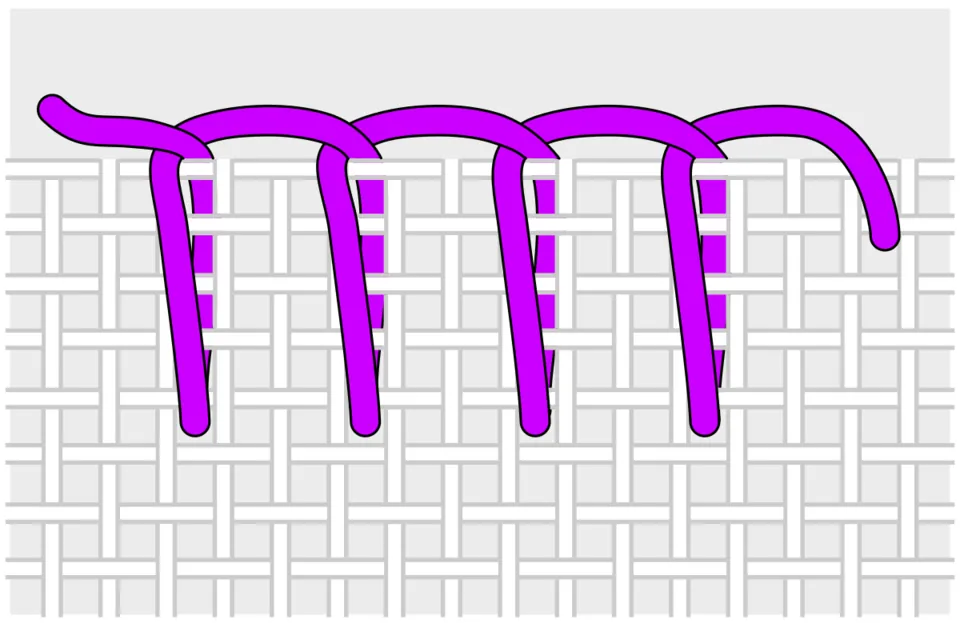
Thread about 18 inches of floss; using two or three strands is a common choice. Start beside the tab, hiding the knot between the two layers. Push the needle straight through both pieces of felt about 1/8 inch from the edge, bring it up through the loop of thread, and pull snug so the stitch sits flat along the edge without puckering. Wee Folk Art's blanket-stitch lessons stress sending the needle straight through both layers and keeping every stitch the same depth on front and back, which is what makes the edge look even.
Turn the point neatly
At the bottom point of the heart, put an extra stitch into the tip so the edge thread wraps around it instead of cutting across. Wee Folk Art suggests anchoring a corner stitch by catching a tiny bit of felt so the loop cannot slide off the point with use. On the curves, keep stitches a little closer together on the inside of each curve so they do not fan out.
Stuff the heart
When you have stitched around to the second curve and have an opening of about an inch left, stop with the needle still threaded. Tear off small tufts of fiberfill and push them into the point first, then into each lobe, using a chopstick. Add a little at a time: a lightly firm, even heart looks best, while overstuffing strains the stitches and distorts the shape.
Close and finish
Continue blanket stitching to close the opening, holding the stuffing back with a finger. When you reach the tab, pass the needle through the tab stitches once more, tie a small knot close to the felt, then push the needle into the heart and out through the side an inch away. Tug gently so the knot slips inside, and snip the thread flush. The tail disappears into the stuffing.
Tip: Before you begin the edge, practice a few blanket stitches on two felt scraps. Five minutes of practice shows you the stitch depth and spacing you like, and makes the real heart much neater.
Ways to personalize it
- Initials or a date. Two initials with a small plus sign, or the date you met, in backstitch.
- Layered hearts. Stitch a smaller heart in a contrasting color onto the front heart before assembly.
- A hidden message. Write a tiny note on a slip of paper, roll it up and tuck it into the stuffing before closing. Tell the recipient it is there only if you want them to find it someday.
- A matching pair. Make two keychains in reversed colors, one for each of you.
- Scent. A pinch of dried lavender mixed into the stuffing makes a heart that smells lovely in a bag; skip this for anyone with allergies or sensitivities.
Safety notes
- Keep track of needles. Park the needle in a pincushion or needle minder whenever you put it down, and count needles and pins at the end of a session. A dropped needle in a carpet is easy to step on and dangerous for pets.
- Use sharp tools carefully. Cut away from your fingers and close scissors when not in use.
- Not a toy for little ones. Split rings, clasps and stuffing are choking hazards. Keep finished keychains away from babies and toddlers, and do not make this as a plush toy for a young child.
- Kids sewing. Older children who are ready for a needle can make these with an adult nearby. A blunt-tip needle and thick felt make it easier, and an adult can do the key ring and final knot.
How to package it as a gift
A keychain is small, so the packaging can do a lot of the work. Clip it onto a card with a short note, slip it into a little kraft box with tissue, or attach it to the outside of a larger gift as a bonus. If you have stitched initials, a handwritten card explaining what they mean makes the gift more personal. Our handmade Valentine cards guide has simple card designs, and a keychain makes a sweet extra alongside the ideas in DIY gifts for your boyfriend.
Frequently asked questions
What kind of felt is best for keychains?
Wool or wool-blend felt is a good choice because it is thicker and holds up better to daily handling. Thin acrylic craft felt works for practice or for decorations that are not handled often.
How many strands of embroidery floss should I use?
Floss comes as six strands twisted together. Splitting it into two or three strands is common for blanket stitch on felt; tutorials differ, so try both on a scrap and choose the look you prefer. Use two strands for small embroidered letters.
How do I keep the key ring from tearing off?
Use a felt tab folded through the ring and sandwich its ends deep between the hearts, then stitch through the tab several times before and after the blanket stitch passes over it.
Can I use a sewing machine instead?
You can sew around the heart with a straight stitch near the edge, leaving a gap to stuff, but the hand-sewn blanket stitch is what gives this keychain its handmade look.
Sources
- Wee Folk Art — Blanket stitching, part 3: corners and sewing two pieces together. weefolkart.com
- Benzie Design — Heart keychain tutorial. benziedesign.com
Image credits. Top image: Hand Stitches - Blanket Stitch by Stilfehler, CC BY-SA 4.0, via Wikimedia Commons
Spotted something out of date or a gift that's no longer available? Tell our editors — we review every correction.